
Welcome To HONDEE


TOP HIFU MANUAL
Instrument installation & operation
1. Host installation method:
Take the host out of the air box and put it on the workbench (as shown in Figure 1). Facing the front of the host, gently lift the screen up to 35mm, push it back, and then lock the screen into host card slot. On the buckle, the screen is fixed on the host (as shown in Figure 2). There are two buckles on the host. Different buckles can lock the screen at different angles (the tilt angle of the screen), and prohibit the screen from scroll back(Figure 3), take the handle accessory frame from the air box and insert it on the fixed socket, take out the handle and insert the handle wire into socket at the back of the host and fix the screw, insert the power cord into the host back power socket and connect it to normal working range power circuit offered. So that the entire instrument is installed (Figure 2).

Instrument parts introduction


Anti-aging HIFU function introduction
We use unique high-energy focused ultrasound to reach the SMAS layer directly, enhances the SMAS fascia suspension, and comprehensively solves the problem of sagging ofascia layer and collagen. The layer plays a role in the muscle growth of the fascia layer, achieving the best effect of shaping, lifting and firming, rejuvenating the collagen, and achieving aging problems such as skin elasticity, whitening, wrinkle removal, and fine pores.At the same time, because the energy is swept across the epidermis, there is no need to worry about the injury of the epidermis, and the skin can be quickly lifted, tightened, and quickly smoothed out wrinkles!
Anti-aging HIFU parts description
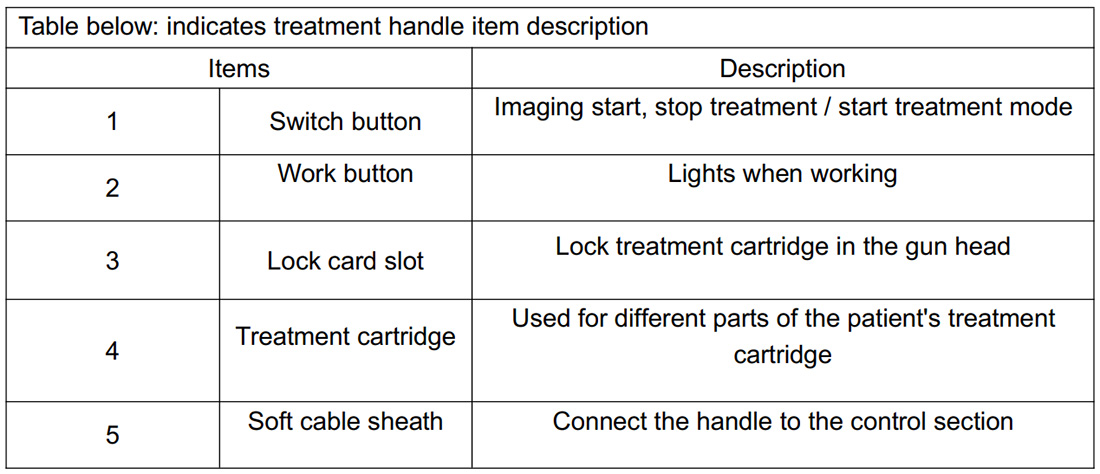
1.The treatment handle is as follows:

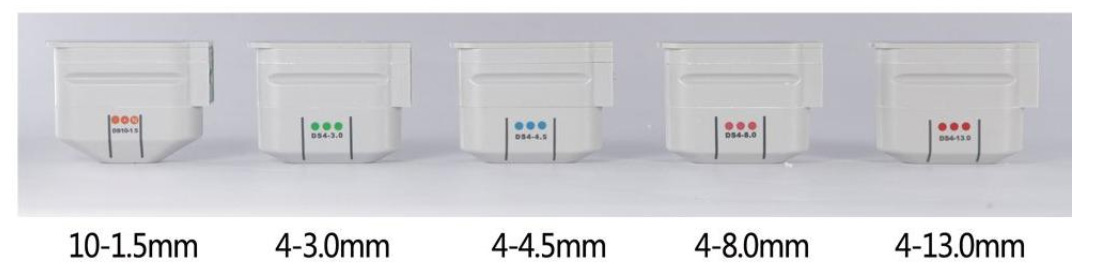
2. The treatment head specifications are as follows:
Operation mode selection interface
1. Turn on the power switch and press the screen switch
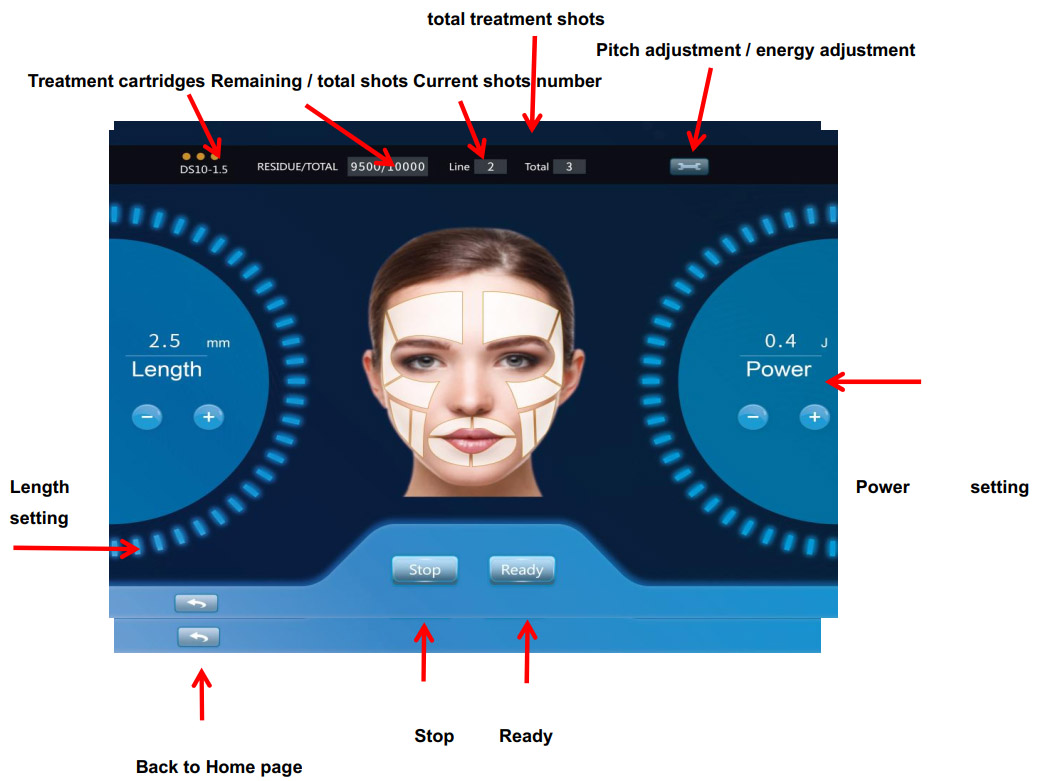
2. enter the HIFU operation interface (as the below picture):
2-1, face operation interface introduction:

2-2, body operation interface introduction:
The background adjustment of each cartridge energy operation interface introduction
In the face operation interface: long press the 3 seconds background energy button to enter the background to adjust the energy interface of each probe (as shown below):
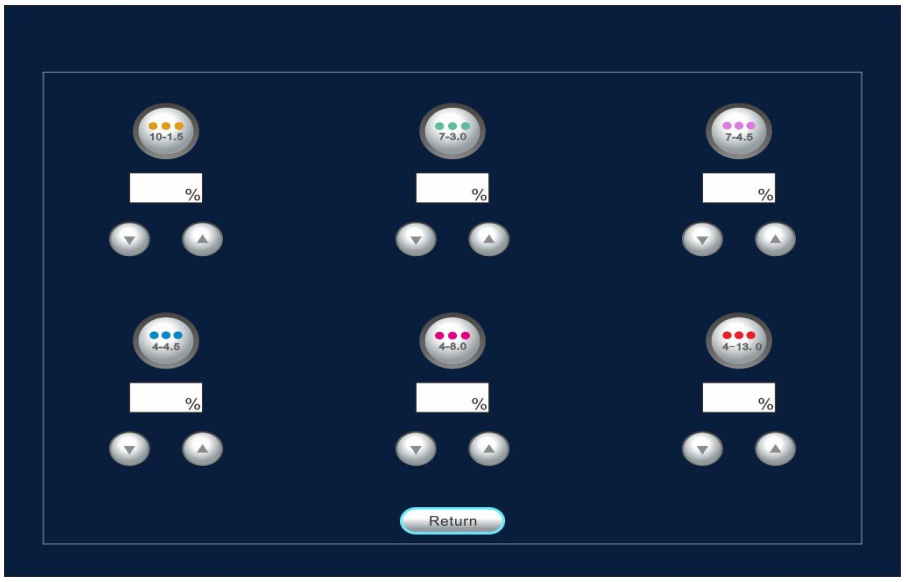
Remarks: Enter the background to adjust the energy interface of each cartridge. Please adjust the output energy according to the tolerance of each customer. The adjustable range is -50% to +50%. You can adjust it if needed. After adjusting, press it Usually It is usually adjusted at the factory, no need to adjust for the user.
Treatment instructions
1.The anti-aging HIFU system pre-guided procedures have been established in clinical trials. the images displayed on the desktop show these guide details as they appear on the system screen, two pre-programmed treatment guides. Please disinfect the cartridges used with alcohol before the instrument is used. the skin of the physiotherapy part should be cleaned first to prevent the dirt from entering the skin with ultrasonic waves or preventing the penetration of ultrasonic waves. Please remove all metal objects from your body before treatment in order to avoid unpredictable conditions and affect the efficacy. Check the cartridge is in good contact with the connector. The cartridge must be full of water and it should not be stuck. Use only ultrasonic cold gel. Do not use other lubricants or emulsions, especially mineral oil, which will eventually damage the cartridge and the circuit. It is better to give the energy of each cartridge from low to high by adjustment so that the experiencer can withstand. Constantly ask the experiencer whether comfort or not, and adjust the energy level to ensure that the experiencer is experienced in a pleasant state. In the problem area, the operation can be strengthened according to the customer's situation (2-3 times). Each treatment area should not be repeated too much, up to three times, to avoid skin redness and swelling. The degree of heat of the cartridge does not represent the output of the ultrasonic power; the liquid or drug with a small concentration should not be directly infiltrated, otherwise it may cause dry skin.
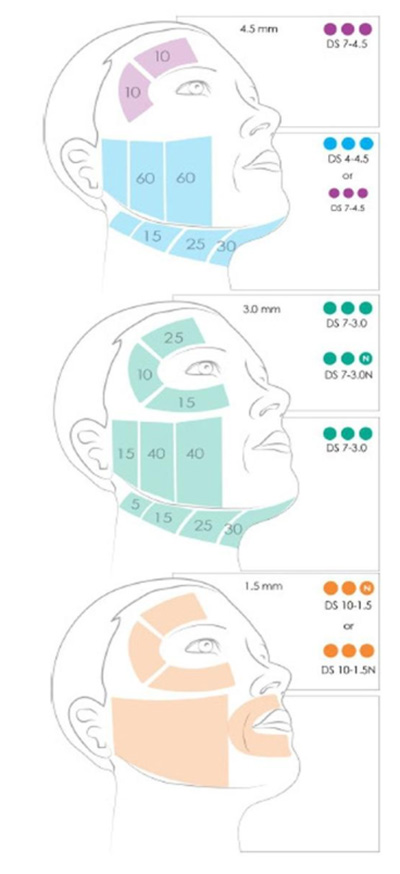
2. Safety guidelines for neck treatment (as shown below)

3. Safety guidelines for face treatment (as shown below)
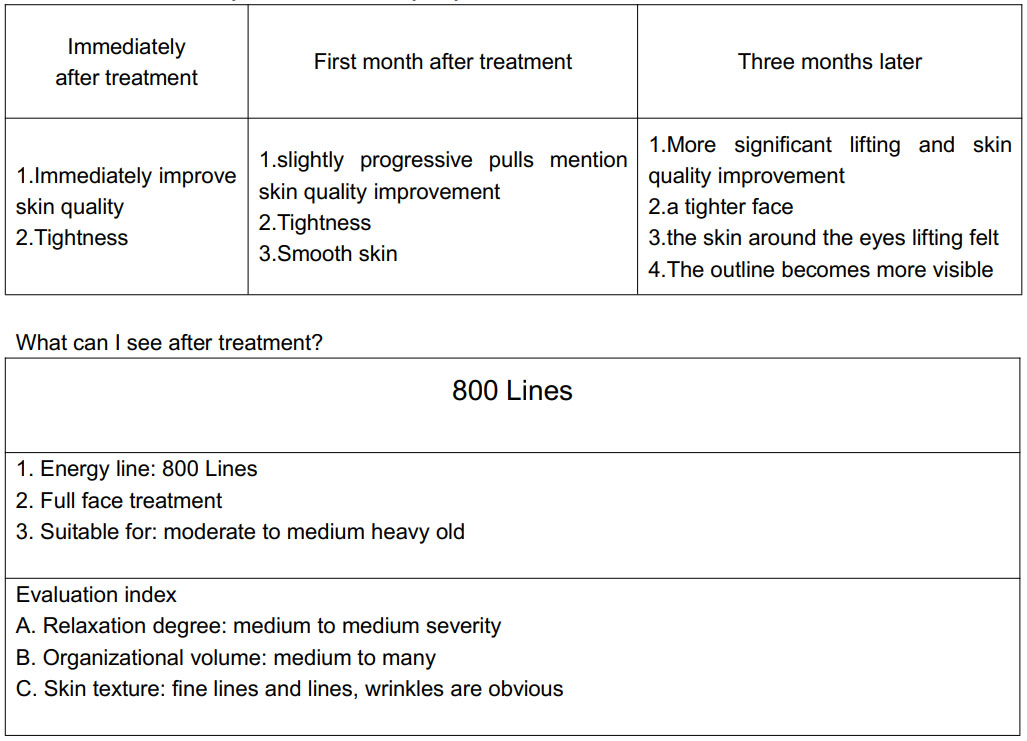
What effect can I see after treatment?
Skin repair and renewal is a gradual process rather than a sudden effect!
Because the new collagen takes time to build the muscles, the effect of the polar line is gradually, and the difference in effect may not be seen every day.
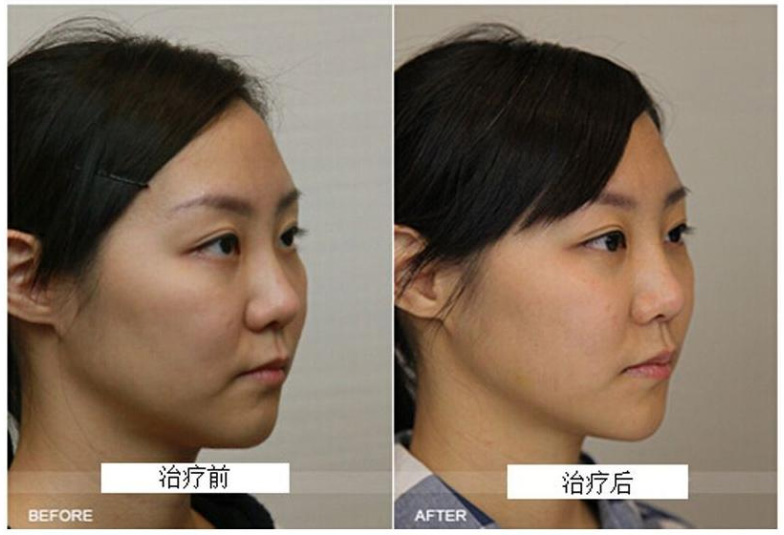
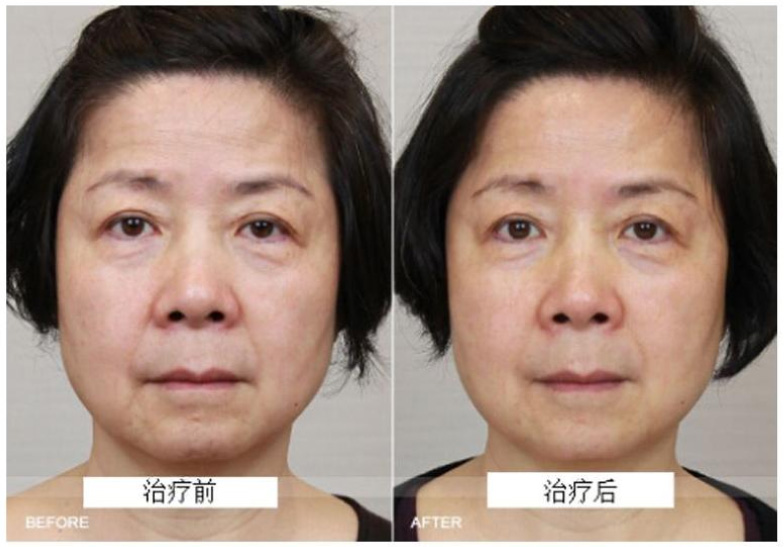
The effect comparison
Treatment guidelines
4.5mm treatment guidelines
[Upper head]
When treating the upper head, please apply it in multiple ways according to the patient's reaction, and move between the rows of areas as appropriate.
1. When performing the first line, the energy is as close as possible to the marking line but be careful not to hit the mandible. Once the image of the mandible appears on the screen, slide the Transducer back
and forth slightly to avoid the positioning of the mandible on the screen.
2. Do not let the center of the energy line exceed the marking line of the thyroid cartilage area.
3. The direct firing of energy to the position of the mandible during treatment increases the likelihood of potential side effects.
[Cheek]
When treating cheeks, please use the number of times according to the patient's reaction and move between the rows.
Do not treat the cheekbones or mandible directly.
Make sure that the treatment energy lines of each row are connected but not overlapping, which is the appropriate treatment density.
The energy directly hitting the mandible or acting on the facial nerve during treatment increases the likelihood of potential side effects.
[Eyelid area]
Place the Transducer in the outer eyelid area with the end of the power cord facing the eye. The planned energy lines are fired at the corners of the eye corners.
1. During the treatment, the Transducer is aligned with the side corner mark line, and the Transducer is centered on the end of the Transducer, and the Transducer is moved to make the energy line of the shot appear a fan-shaped image.
2. Each time you hit an energy line, you need to reposition the Transducer. You can't just turn the front end of the Transducer to avoid repeating the same position.
[Above the eyebrows]
Place the Transducer in the eyebrow area with the end of the power cord facing the eye. The planned energy line is evenly fired in the area.
Adjust the shortened energy line length when needed:
- The image shows that the edge of the positioning indicator has fallen on the forehead bone position.
- Forehead bone over-surface has been affected to fit and energize
- When the patient's pain response is more significant
Basic notes:
Do not allow the energy line to be in any position that will be fired to the eye during operation. If the green positioning indicator on the screen is at the bone position, do not fire energy.
3.0mm treatment guidelines
[Upper head]
When treating the upper head, please apply it in multiple ways according to the patient's reaction, and place the Transducer in the outer eyelid area. The end of the power cord is toward the eye and moves
between the rows of the area.
1. When performing the first line, the energy is as close as possible to the marking line but be careful not to hit the mandible. Once the image of the mandible appears on the screen, slide the Transducer back and forth slightly to avoid the positioning of the mandible on the screen.
2. Do not let the center of the energy line exceed the marking line of the thyroid cartilage area.
3. The direct firing of energy to the position of the mandible during treatment increases the likelihood of potential side effects.
[Cheek]
When treating cheeks, please use the number of times according to the patient's reaction and move between the rows.
Do not treat the cheekbones or mandible directly.
Make sure that the treatment energy lines of each row are connected but not overlapping, which is the appropriate treatment density.
The energy directly hitting the mandible or acting on the facial nerve during treatment increases the likelihood of potential side effects.
[Eyelid area]
Place the Transducer in the outer eyelid area with the end of the power cord facing the eye. The planned energy lines are fired at the corners of the eye corners.
1. During the treatment, the Transducer is aligned with the side corner mark line, and the Transducer is centered on the end of the Transducer, and the Transducer is moved to make the energy line of the shot appear a fan-shaped image.
2. Each time you hit an energy line, you need to reposition the Transducer. You can't just turn the front end of the Transducer to avoid repeating the same position.
[Above the eyebrows]
Place the Transducer in the eyebrow area with the end of the power cord facing the eye. The planned energy line is evenly fired in the area.
Adjust the shortened energy line length when needed:
- The image shows that the edge of the positioning indicator has fallen on the forehead bone position.
- Forehead bone over-surface has been affected to fit and energize
- When the patient's pain response is more significant
[Under the eye]
1. Align the Transducer with the marking line under the eyes and gently pull the underarm skin down.
2. Fire the top energy line in the first row and then fire the next one. Keep the Transducer angle correct during the process, do not tilt.
Basic notes:
Do not allow the energy line to be in any position that will be fired to the eye during operation. If the green positioning indicator on the screen is at the bone position, do not fire energy
Quick start guide
[Start system]
1. Make sure the power cord on the back of the instrument is plugged in.
2. Make sure the main power switch on the back of the instrument is turned "ON".
3. Insert the Transducer start key (USB Key) into the USB connector on the back of the instrument.
4. Press the green start button on the front of the instrument
[System imaging]
1. Mount the Transducer on the handle
2. Add a thin gel on the Ultrasonic Transducer window and place the Transducer on the thoroughly cleaned skin.
3. Tap the “SCAN” button on the screen to launch the avatar program, or press the “SEE” button on the handle to start imaging.
4. Confirm that the Transducer and the patient's skin are properly coupled
[Executive treatment]
1. Select the area to be treated
2. Press the SEE button on the handle to get ready. When the button is lit, the system is ready.
3. Apply a thin layer of ultrasonic gel to the Transducer conductor window for good coupling
4. Make sure there is a proper fit between the Transducer and the skin.
5. Press the TREAT button on the handle to fire a supersonic energy line.
6. Push the Transducer forward about 2-3mm
7. Press the “TREAT” button to fire each energy line (make sure the handle remains stable and immovable during energy transfer)
8. Repeat steps 3-7 for treatment until the number of lines required to complete the planning of the area is completed.
9. Click on the next area to be treated on the screen to switch. The previously treated area will become the representative color of the Transducer used, and the selected treatment area will turn white ready.
10. When all areas have been treated, press the “End of Treatment” button in the lower right corner of the screen, then click the “Confirm Complete” button.
Preparation before treatment
1. Enter the patient's name and ID number on the system
2. Enter or select the name of the physician performing the treatment
3. Select the treatment guide you need
4. Click on the "Start Treatment" button
Translucent: not yet treated
The area that can be treated will show a translucent color, and the number of energy lines to be given in the area and realistically planned
White: area of treatment
The area under treatment is white, and the peripheral line is the representative color of the Transducer in the area, and the number of energy lines executed is displayed in the middle.
Color Block: Treated
The area that has been treated presents the Transducer color used, and the number of energy lines treated in the area is shown in the middle.
Taboo
The following symptoms should be used with caution. Please consult a doctor or professional before using. The details are as follows:
1. When using the instrument, the cartridge should not be close to the eyes, can not pass the eyeballs, pregnant women and people with severe heart disease.
2. Patients who are ill should ]also use this machine with caution unless approved by a doctor.
3. Patients with malignant tumors and hemophilia or severe bleeding can’t be treated by this machine.
4. Patients with major diseases, skin diseases and infectious diseases should use the machine with caution.
5. The heart, brain, neck nerve center, spine, eyeball, bleeding, injection patient can’t be treated by this machine.
6. Hyperthyroidism patients, asthma patients, and hypertensive patients can’t be treated by this machine.
7. 2 in 1 antiaging HIFU treatment can be performed after 20-30 days of injection of hyaluronic acid.
8. Do not eat spicy food after 3D antiaging treatment. Do not wash your face with overheated water or cold water in one week. Do not use high temperature yoga, sauna, steaming face and facial massage (to avoid facial compression). Apply mask every day for hydration within one week. Pay attention to sun protection. Do not use radio frequency or light machines for treatment within one month.
Common faults
1. There is no display on the machine interface. Please check if the power plug is connected well or not, and the power switch is turned on or not.
2. The machine is normal but there is no energy output or power-on alarm. Please check whether the handle cable is firmly connected to the host or the cartridge is installed.
3.When the cartridge is not flat with the face, the instrument will automatically turn off, just restart it to start treatment.
Care and maintenance
1. Wipe the machine off with alcohol and keep it safely after using.
2. Make sure a plug with a grounding pin used before use and the power socket of the machine must be grounded.
3. The machine voltage is well-matched. If the local power supply voltage is unstable, we recommend that the user increase the power matching power supply.
4. Please use the designated accessories provided or recommended by the original manufacturer in order to make sure the machine's treatment effect and normal service life.
5. Don’t place the machine in the wet or near the water source, do not expose the machine directly to the sun.
6. Don’t let the machine close to a strong heat source, as this may affect the life of the machine and normal use.
7. Please remove all metal objects from your body first to avoid unpredictable conditions and affect the efficacy.
8. Please pay attention to the skin touched should have a certain degree of wetness in order to avoid poor contact. You can wipe with water products or water to achieve the desired effect.
9. Turn off the power switch of the machine when the machine is not in use, and make sure that the total power of the machine is turned off to ensure the safety of the electrical products.
10. Use the machine or train the machine operator in strict accordance with the instructions in the manual.
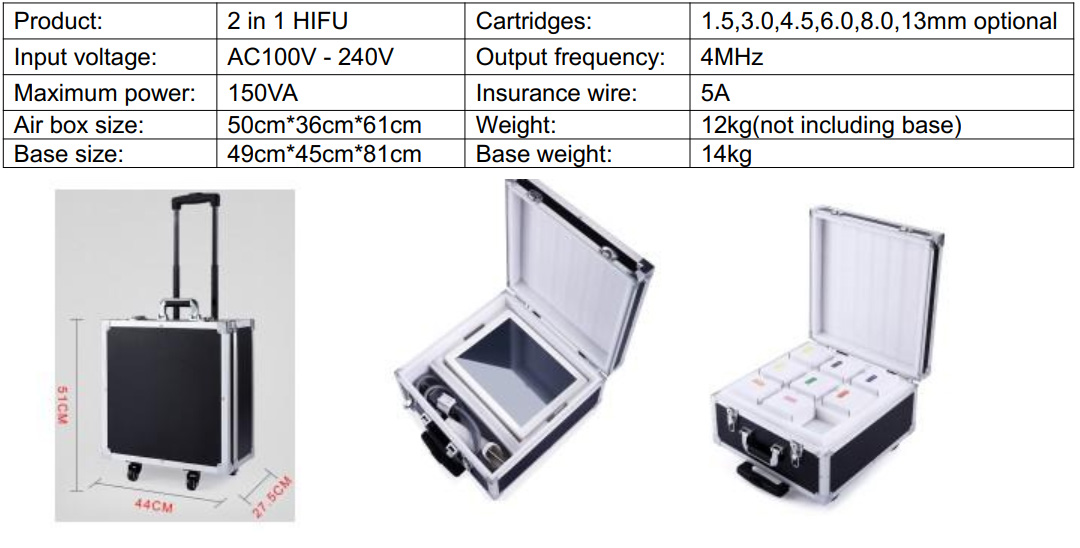
Technical parameters and packaging size
Products categories
WHY CHOOSE US
Since its establishment, our factory has been developing first world class products with adhering the principle
of quality first. Our products have gained excellent reputation in the industry and valuabletrusty among new and old customers..
- Tel:86-18982061851
- 2nd Floor, Building A, Shiguan Hondee Industrial Park,Tongsheng Community, Dalang Street, LongHua District, Shenzhen, Guangdong Province, P. R. China 518000
- admin@hondeebeauty.com


Liposonix For Body Shaping, Facial Beauty Equipment, Hifu V-Max, Derma Wand Hair Removal Machine Beauty Equipment, Hair Removal Device Home Use, Beauty Slimming Equipment,